Student Guide to Moodle
| Site: | SOU Raider Moodle |
| Course: | SOU Raider Moodle |
| Book: | Student Guide to Moodle |
| Printed by: | |
| Date: | Tuesday, June 23, 2026, 3:52 AM |
Description
Updated and expanded guide to everything Moodle at SOU!
Welcome to Moodle!
![]() If you're new to Moodle, this guide will provide information about getting started and using many of its common tools and features.
If you're new to Moodle, this guide will provide information about getting started and using many of its common tools and features.
To navigate through this guide, click on a chapter name in the table of contents on the right or use the arrows in the upper and lower right corner of each page. (Expand the blocks panel on the right to display the table of contents for this book. If you don't see the table of contents on the right, you'll find it below the content of each page.)
Browser Requirements
![]() We recommend using a recent version of Firefox or Chrome. While Safari may be fine for viewing Moodle resources, we don't recommend using it for submitting assignments or taking tests in Moodle. Internet Explorer will NOT work for our current version of Moodle.
We recommend using a recent version of Firefox or Chrome. While Safari may be fine for viewing Moodle resources, we don't recommend using it for submitting assignments or taking tests in Moodle. Internet Explorer will NOT work for our current version of Moodle.
We also recommend a high speed Internet connection for best performance.
Pay attention as you download any software to ensure that you are not installing applications that you don't want at the same time. You are not required to agree to add other features to use the browser.
Accessing Your Courses
Be sure you are logged into Moodle before attempting to access your courses. There are four ways to access your courses:
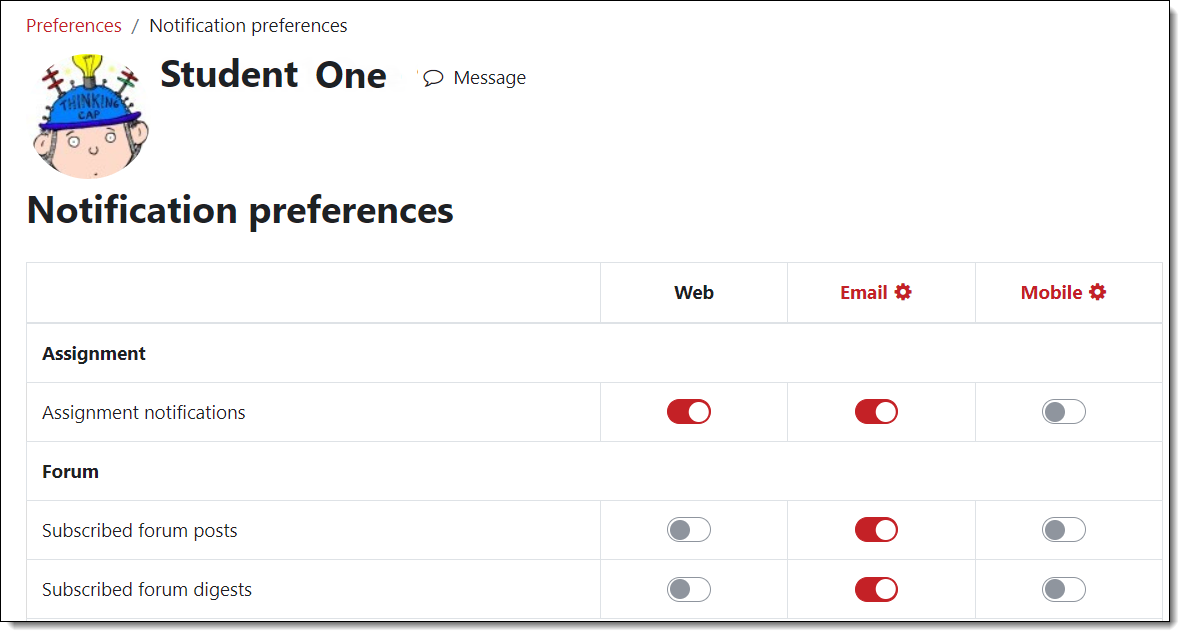
- My courses list. Expand the blocks drawer on the right side of your landing page and open the term category to access courses available to you in a given term.
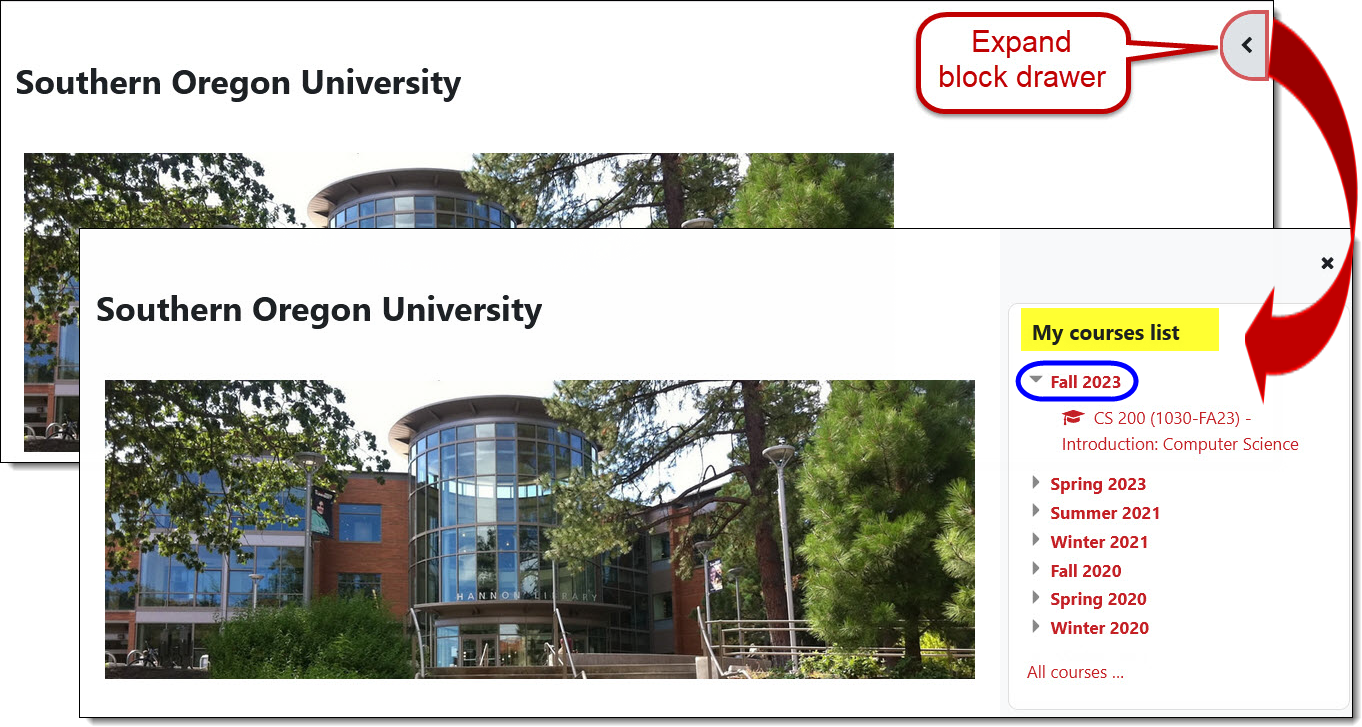
- Dashboard: Click on the link in the red border at the top of the page. Your dashboard will include a section for courses that you have recently accessed, links to activities that you last opened, and any courses that you have starred for quick access. Learn more about your dashboard.
- My courses: Click on the link in the red border at the top of the page. All of the courses that you are enrolled in will be shown on the page. Use the filter options at the top of the page to locate past courses.
- My courses: This list is located in the center column of your Moodle landing page under announcements and links to Moodle guides. Courses for the current term are listed first, followed by any courses from prior terms that are still available to you. (You cannot hide any courses in this list. The only way to remove a course from the list is to ask the instructor to make it unavailable.)

Dashboard Overview
Here's a quick overview of what's in your dashboard. Learn more, including how to customize your dashboard.
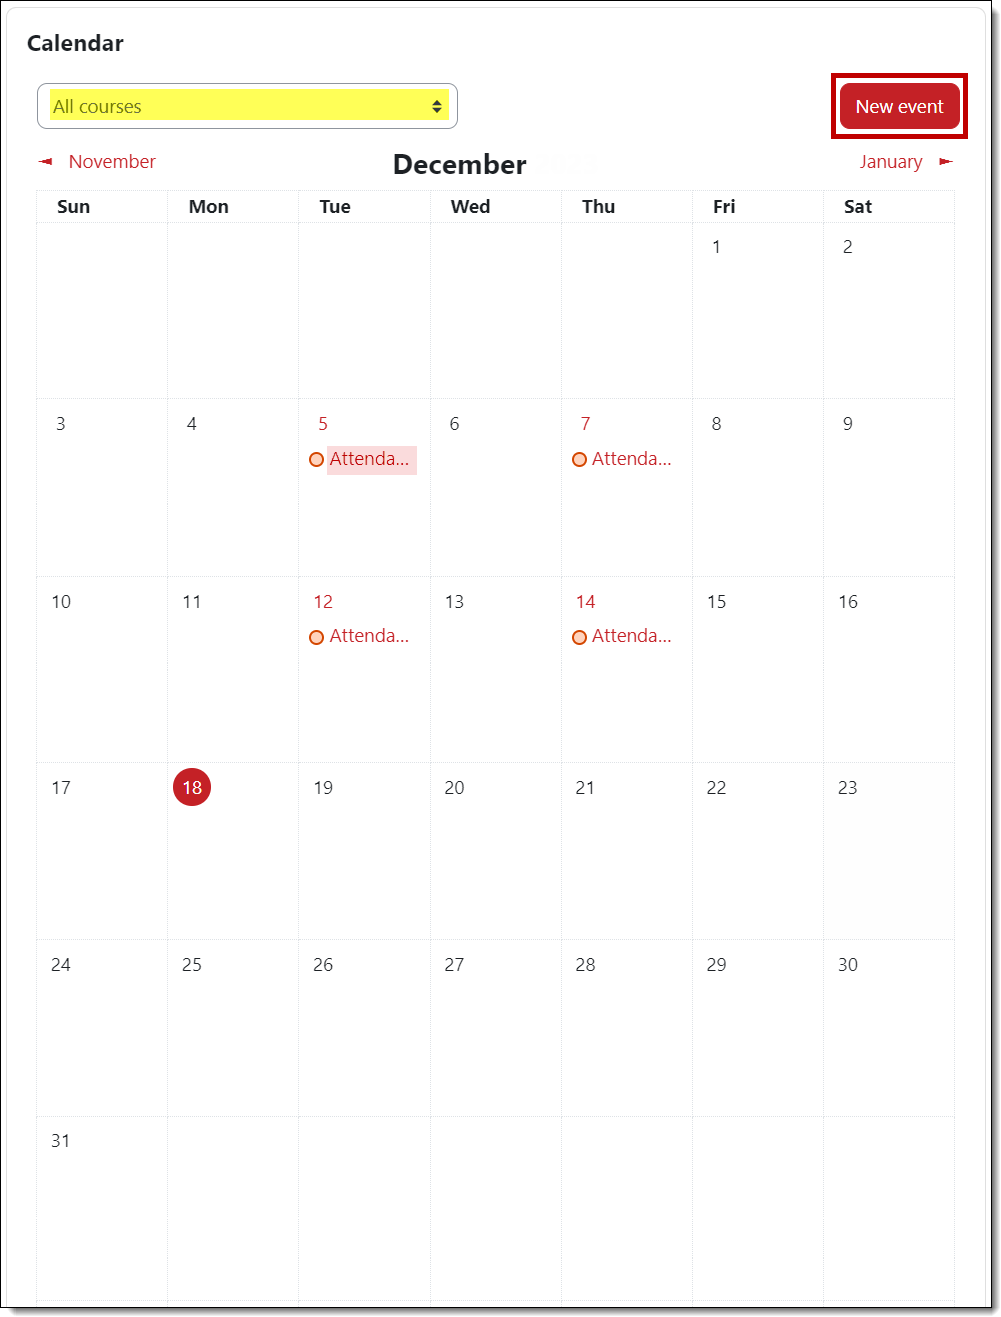
Dashboard Calendar
Your dashboard also includes a calendar which displays activity due dates and events for all of your courses. Clicking on an entry displays more information and a link to go to the activity itself. You can add personal notes by clicking on the New event button.
Navigating Your Course
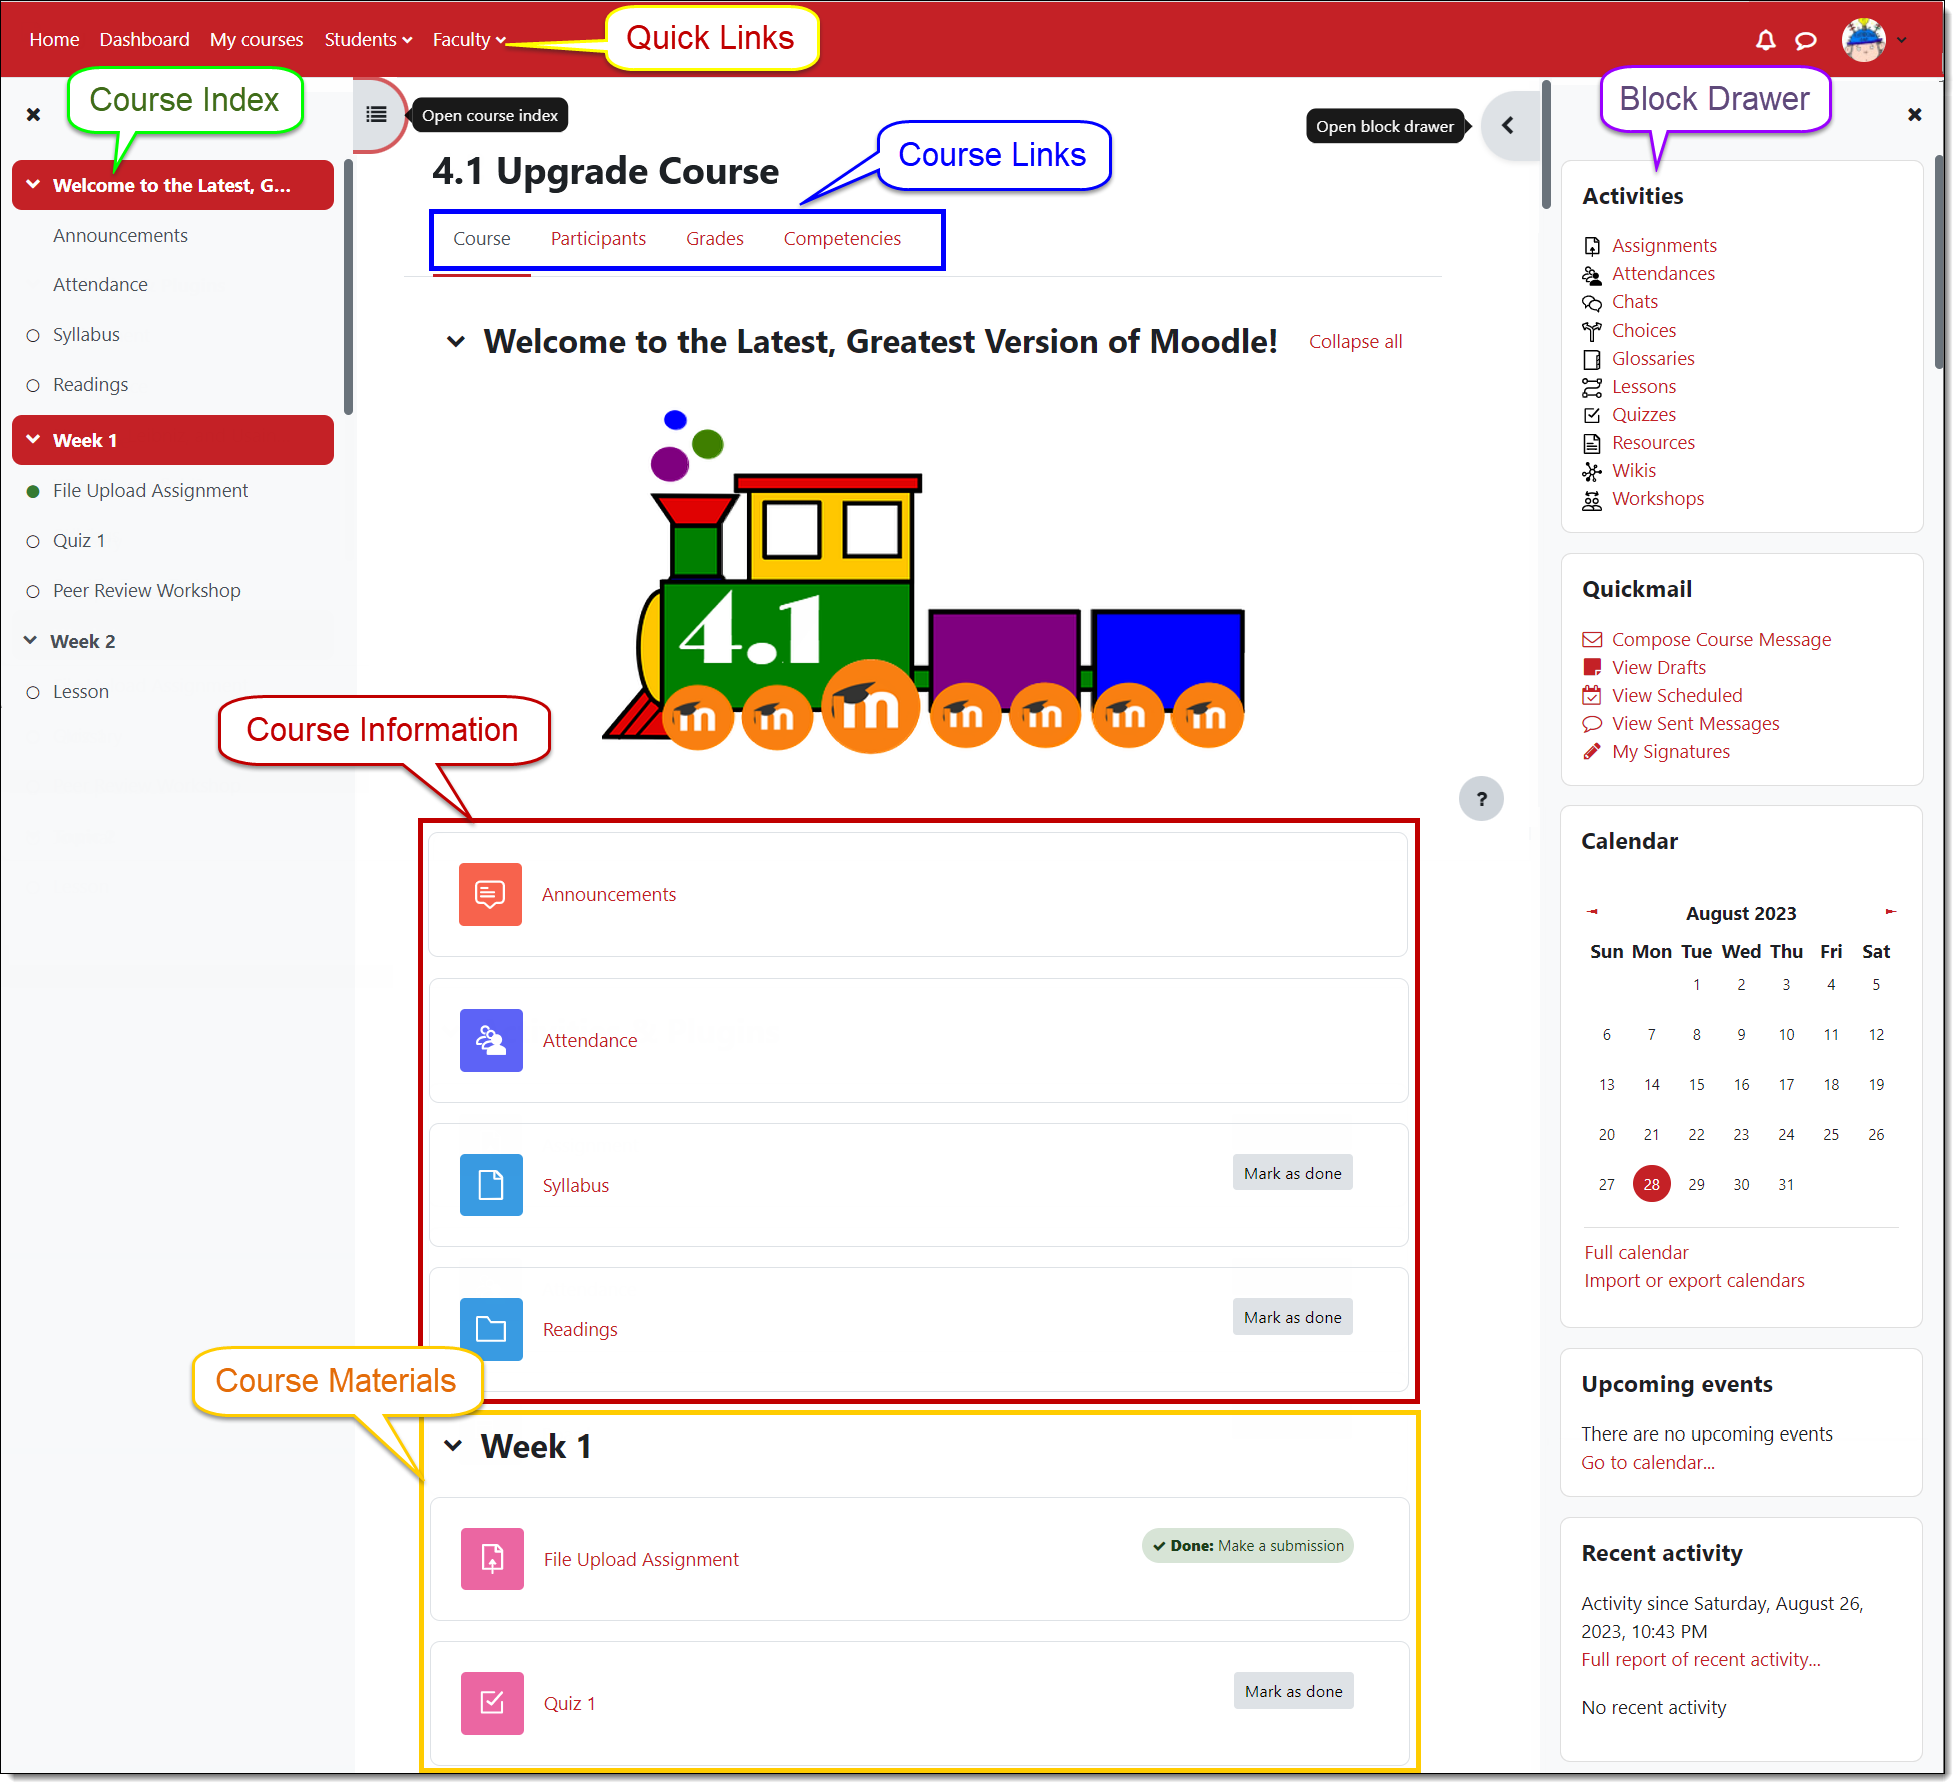
To open a course, click on its name. At the very top of the page, you'll find quick links to your dashboard and to a list of your courses as well as a pull-down menu with helpful links including Moodle How-to's for Students.
In the course information area in the top section of the page, you will likely see an Announcements link, the course syllabus and other materials posted by your instructor. The sections below will contain links for activities and resources that you will need to access throughout the term.
In the Course index on the left, you'll find links to all of the activities and resources in the course. Across the top of the page you'll find course links for accessing a course participant list and your grades. On the right side of the page (or at the bottom, depending on your screen view) you'll find course tools in the Blocks drawer or panel. Blocks include Activities, Quickmail and Calendar. The Activities block offers quick links to all of the activities and resources posted in your course. With the Quickmail block, you can send email to your instructor or classmates (all messages go to SOU email accounts). Your course may also include blocks for a course calendar, SOU Resources, upcoming events, recent announcements, etc. Both the Course index panel and the Blocks drawer can be collapsed by clicking on the X in the top corner.
A so-called "breadcrumb trail" appears just below the quick links near the top of the Moodle page. Each time you open a new page, a link to the previous page appears on this trail.
- Click on "Home" to return to your Moodle home page (where you land after you log in).
- Click on the course name to return to the course home page (where you land when you first open the course).
Course Icons
You'll find many different kinds of resources and activities in Moodle. Note that your instructors may post items so that you can check them off as you complete them (Mark as done), as shown in the example shown below. In other cases, you will need to view or post something before Moodle automatically checks it off. The action required will be spelled out on the course page as shown below.
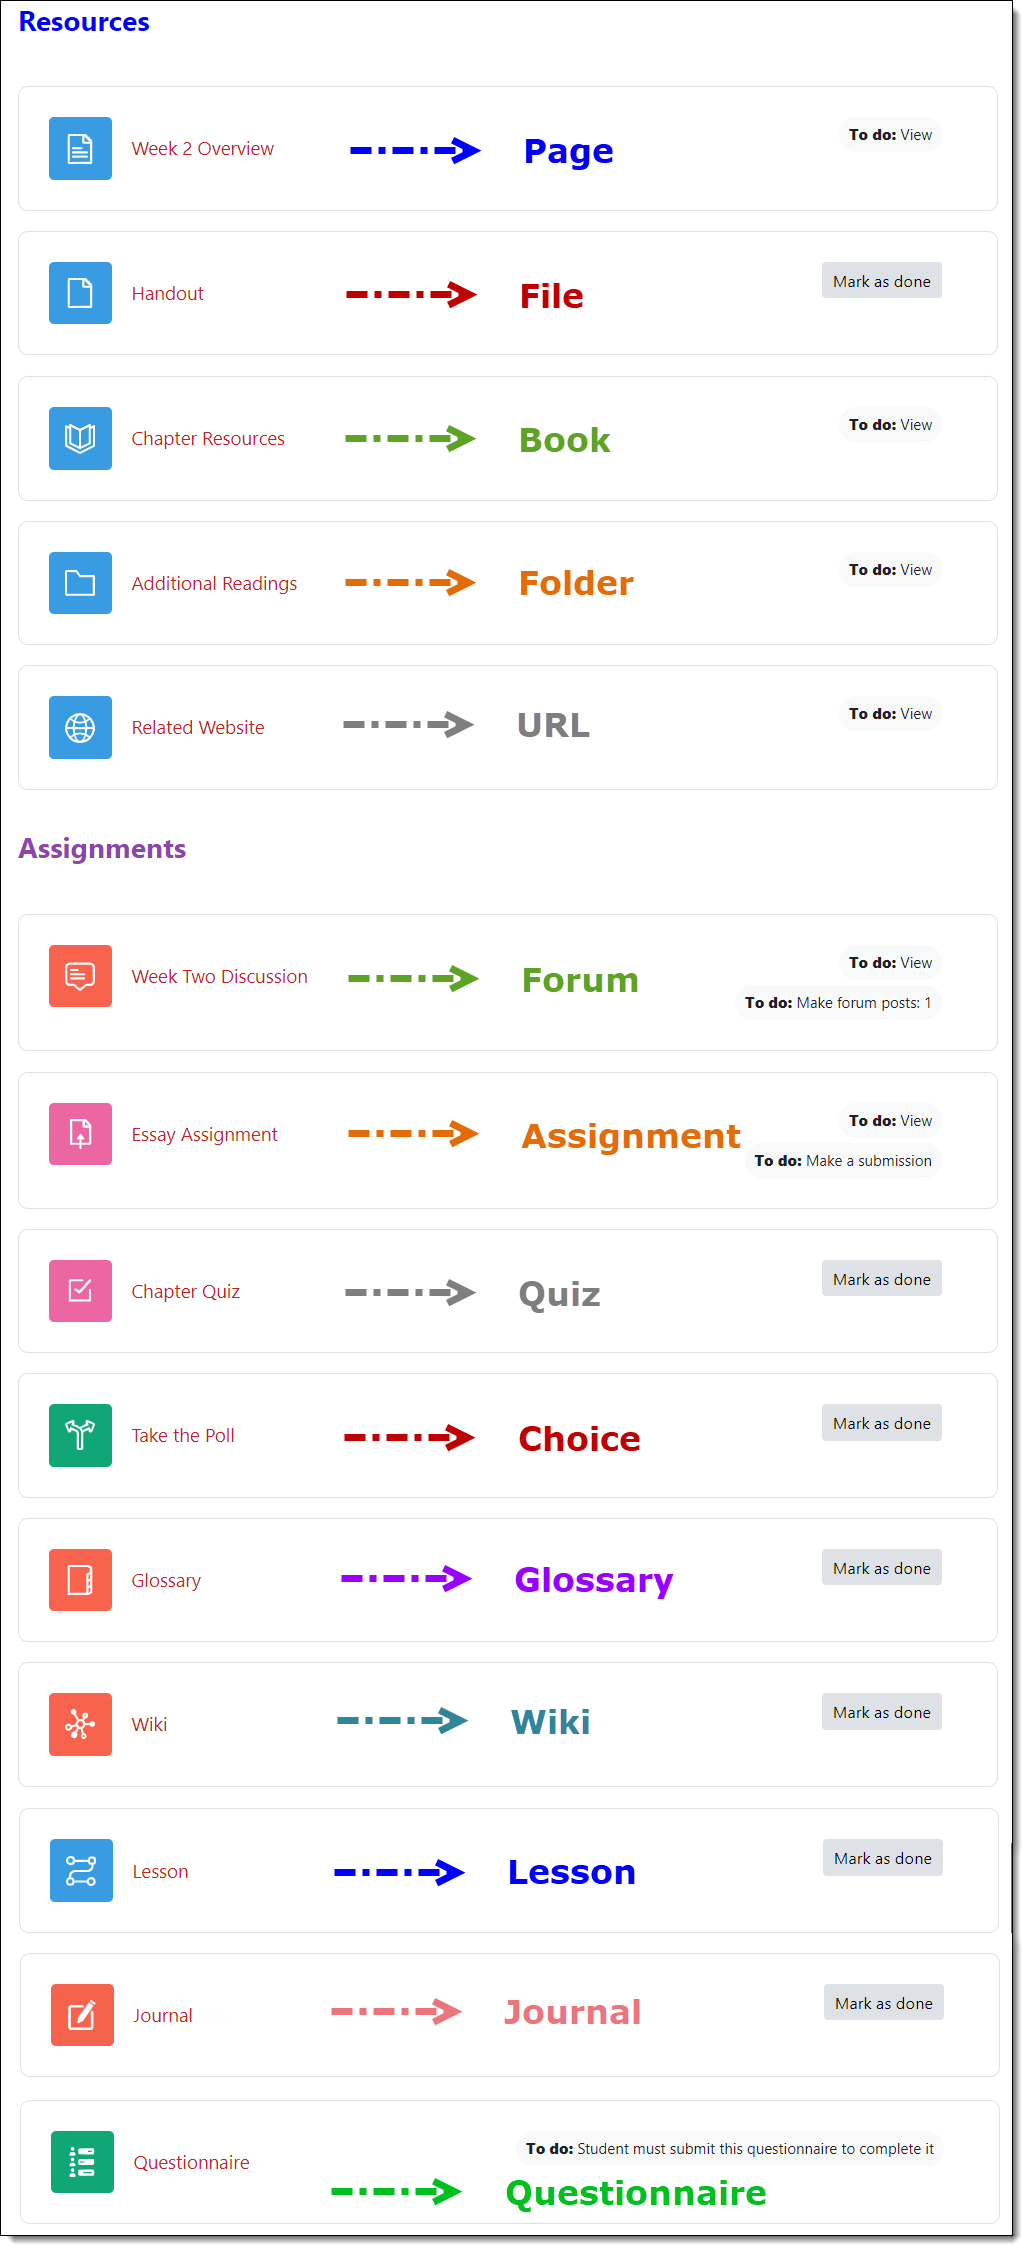
Course elements are color-coded by general function:
- Blue for content (page, file, URL, book, folder, etc.)
- Green for collaboration (chat, choice, questionnaire, etc.)
- Pink for assessment (assignment, quiz, workshop, etc.)
- Red for communication (forum, glossary, wiki, etc.)
Here is a quick guide to some of the most common course elements.
Web Page. A web page will contain text and may also contain web links or embedded files to be used as resources.
Files. Many kinds of files may be linked in your course site.
Book. A book may contain all kinds of things: web links, text, embedded files, audio links, video links— you name it!
Folder. A folder contains files that you can open or download to your computer.
URL. Web links may be provided for your reference.
Forum. Discussion forums offer opportunities to reflect on your learning and share ideas with your classmates.
Assignment. Links for assignments may allow you to upload files or enter text. To see your score and feedback from your instructor, reopen a link after the assignment
has been graded. This guide to assignments has
more information.
Quiz. Moodle calls any kind of online test a "quiz." Tests, midterms, and final exams will all appear as quizzes in Moodle.
Choice. A choice is a polling feature that your instructor might use to find out what you think about a topic or to have you sign up for a project.
Glossary. You may have the opportunity to contribute to a glossary by adding a "concept" and "definition."
Wiki. A wiki is a space for collaborative writing.
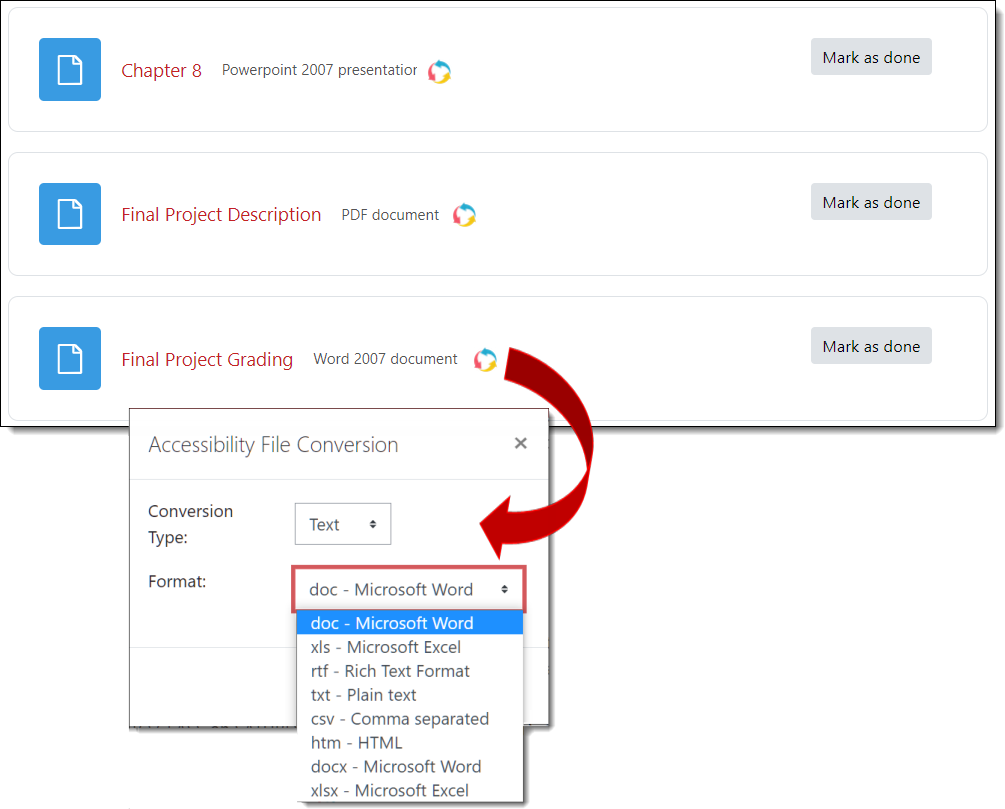
File Conversions
Moodle has a file conversion app that lets you request a different type of file than the one posted in your course. A pdf, for instance, can be converted to a variety of text file types, naturally, BUT it can also be converted to:
- an audio file (featuring natural phrasing and intonation—and you can choose the playback speed!),
- an e-reader file (with a choice of formats!), or
- a Braille file.
Updating Your Profile
 Profiles help to build a sense of community. Your Moodle profile will be accessible in any course in which you are enrolled, so you need only create it once and update it as needed. Updating your profile is easy to do!
Editing Your Profile
To view or edit your profile:
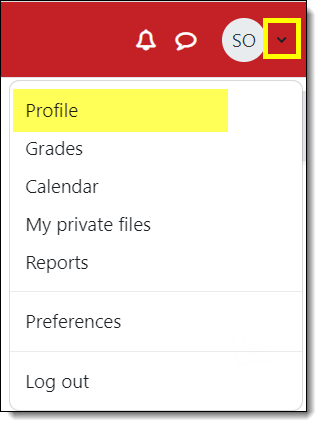
- Click on the caret icon in the upper right corner to open the pull-down user menu.
- Choose Profile.
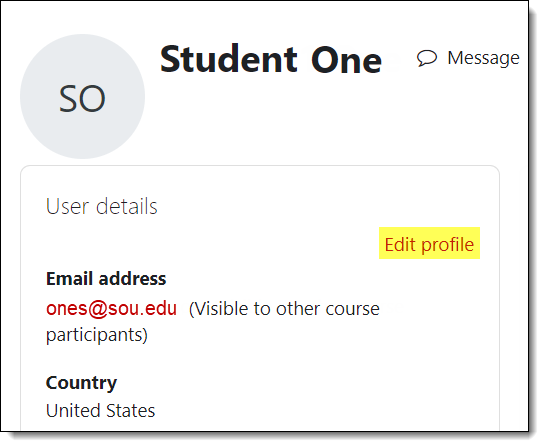
- Click on the Edit profile link in your dashboard.
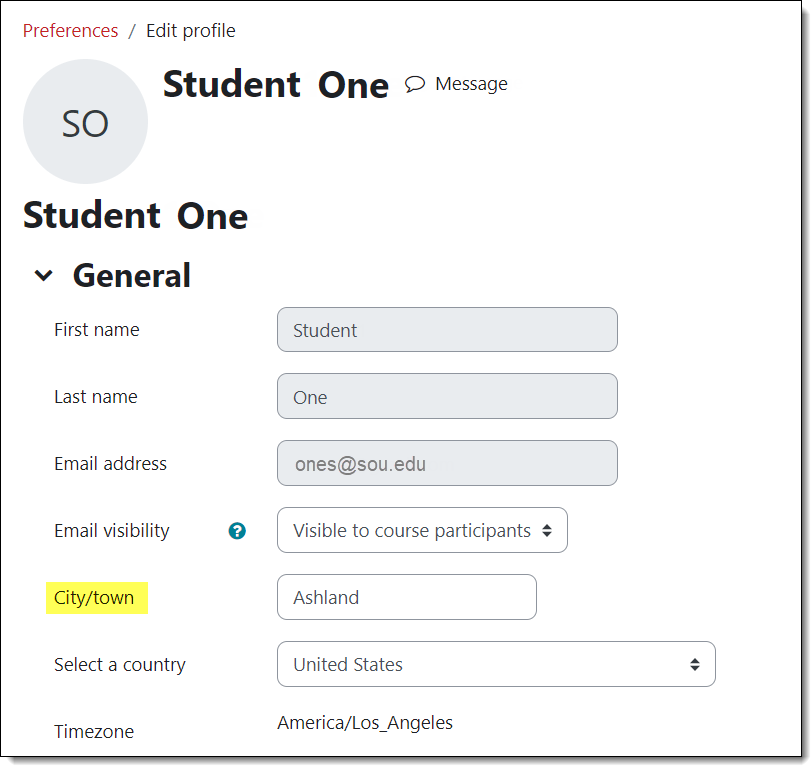
- Fill in the city/town field and as many other fields as desired.
- Click on the Update profile button at the bottom of the page when you are finished.
How to edit specific fields in your profile is described in the following pages...
Personalize Your Profile
Add a Picture
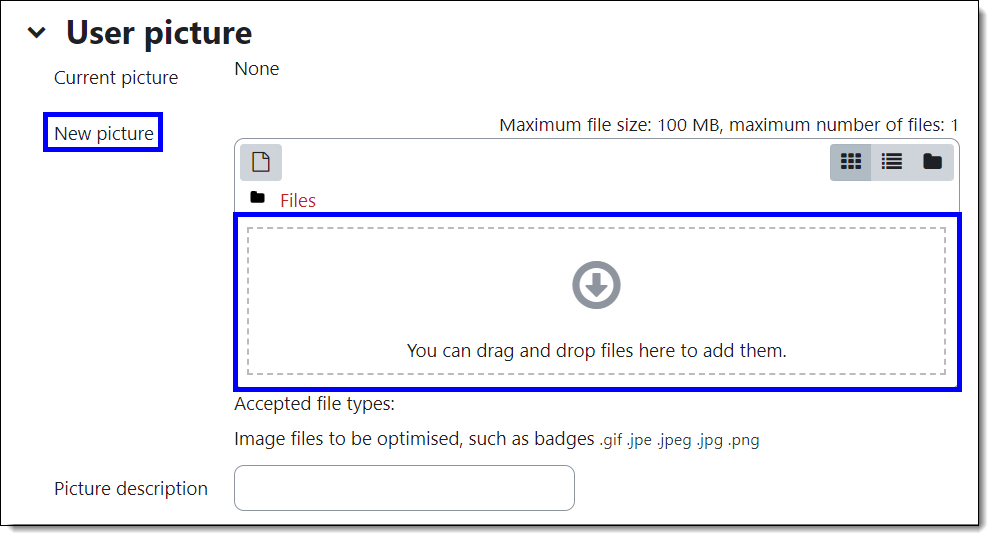
You are encouraged to include a picture in your profile. Here are some things to know about this feature:
- A smaller version of your picture will appear next to your forum postings.
- Your picture must be saved in JPG or PNG format.
- Profile pictures are automatically cropped and resized to 100 x 100 pixels, so be sure to use a close-up of your face, not a full-length photo.
Upload your photo by dragging and dropping it into the file selection box or by clicking on the Files link at the top of the box. (Learn about resizing images in Moodle.) Add a description of your picture for anyone using a screenreader or other adaptive technology to view your profile. If you wish to include pronouns with your profile, the Picture description field is one place to add them.
Note: To return to your Moodle home page after updating your profile, click on Home in the upper left corner of the screen.
The additional fields in your profile will not be displayed to others, so they can safely be ignored.
Page down and click on Update profile to save your changes.
Change Your Name
You cannot change your name directly in Moodle. To use a different, preferred first name in Moodle and other SOU records, see this information page.
(While there is an "Additional Names" area in your profile, none of these fields is visible to any other users.)
Email Settings

Your Moodle profile is set for your SOU email address. All messages sent from Moodle will go to this address. If you prefer to use an alternate address for SOU email, you can set up your email to forward messages to that account.
Participating in Discussions
 Online forums allow you to reflect and share your thoughts about what you are learning. Messages remain posted in the forum for participants to read and respond to within a time frame set by your instructor or any time.
Online discussions are usually considered to be homework, so be sure to review your writing prior to posting your thoughts. Follow your instructor's guidelines carefully to ensure that you receive proper credit for your postings. For example, you might be required to post to a forum at least once during the first half of the week, and then respond to another student's posting by the end of the week.
This handy handout explains how to participate in Moodle discussion forums. (See this accessible version in
Word.)
Check out these helpful hints:
Helpful Hint #1: If you spend a lot of time composing a response, you might want to draft it in a Word document and then copy and paste what you've written into your forum message. If you craft a lengthy reply in Moodle itself, select all of the text in the message box and copy it before you attempt to post it, just in case your browser session has timed out without warning. If you need to, you can paste it into a new textbox—and avoid the frustration of having to start all over again! Read more about how to avoid losing text in textboxes.
Helpful Hint #2:You may be asked to attach a file to a discussion post in order to share your work with classmates. When you do, be sure your file name includes a file extension (.doc, .xls, .pdf, etc.) so that others will be able to open the file. Learn how to "embed" a web link in a post in case you'd like to provide a link to a website in your discussion thread.
Helpful Hint #3:You can insert photos in your posts, but be sure to make them a reasonable size (4" x 5" or 300 x 400 pixels, under 1MB) before you post them. Moodle displays photos in their "native" size – a full-screen photo of you and that steelhead might be a bit much for the rest of us! Find out how to resize images for Moodle.
View Forum Feedback
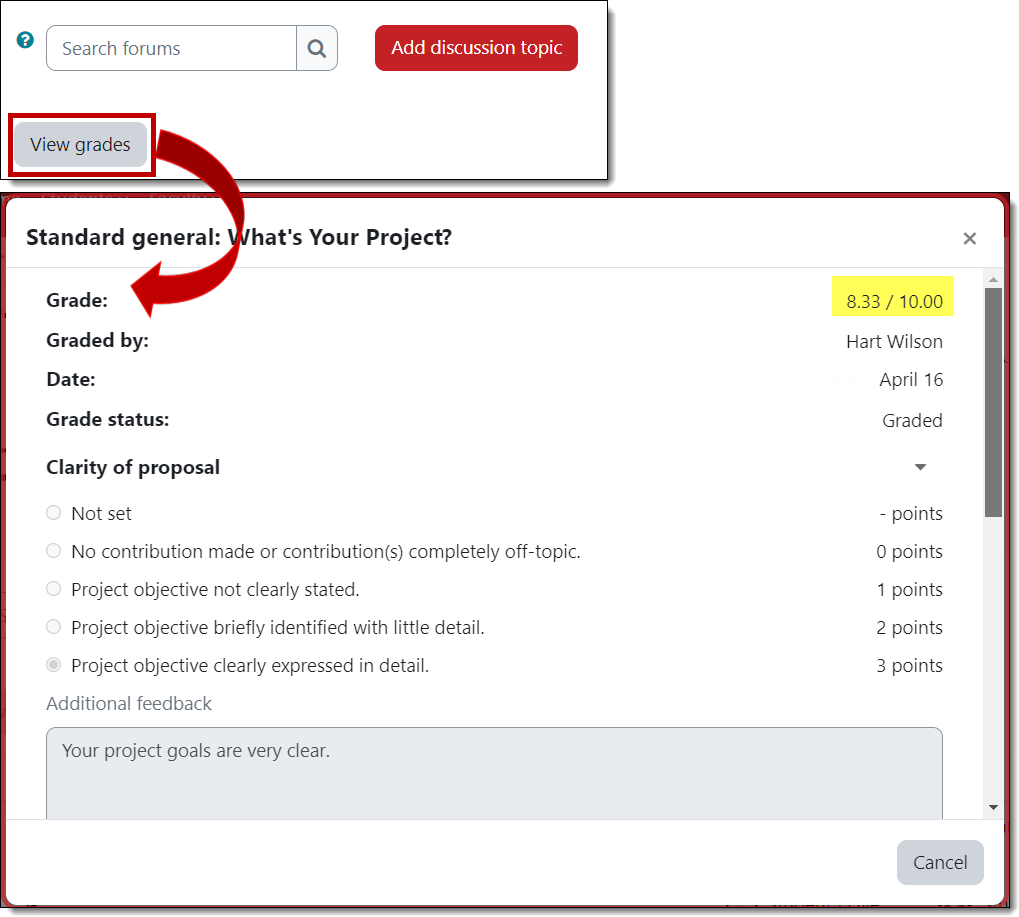
The gradebook will show you a score for a forum, but if your instructor used a rubric to grade it, you won't see the individual scores that contributed to your total score and you'll miss any feedback that your instructor provided.
To review your individual scores and feedback, open the forum link and click on View grades. (See this article to learn more about viewing feedback in a rubric.)
Announcements Forum
 The Announcements forum is used by instructors to communicate important information about the course. You will receive an email whenever your instructor posts to this forum. It's helpful to know that this is not a true forum—it's a form of one-way communication
for instructors to post announcements for course participants. You cannot reply to a posting here.
The Announcements forum is used by instructors to communicate important information about the course. You will receive an email whenever your instructor posts to this forum. It's helpful to know that this is not a true forum—it's a form of one-way communication
for instructors to post announcements for course participants. You cannot reply to a posting here.
Editing Text
Adding a Topic
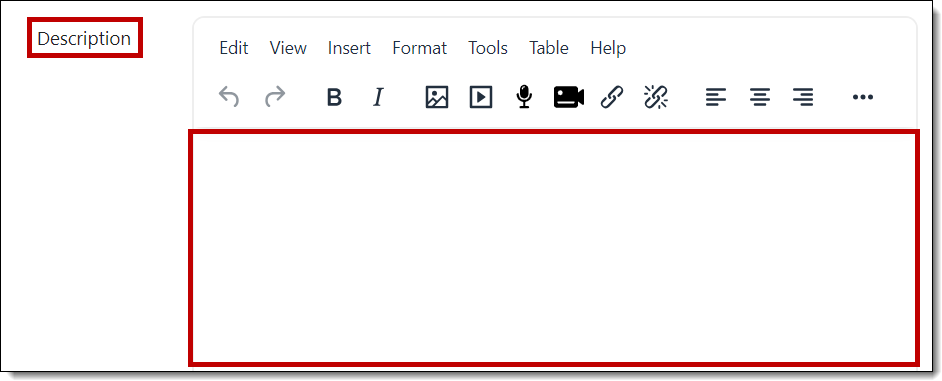
When you add a discussion topic, you'll have a full editor in the textbox. You can write your response directly in the textbox provided or write it outside of Moodle and copy it over. If you draft your response outside of Moodle, copy what you have
written using Ctrl+C or Cmd+C. Use Ctrl+V or Cmd+V to paste what
you copied into the new text box (right-clicking and
pasting will not work online due to browser limitations).
This complete guide to editing text describes the icons that you'll encounter in Moodle text boxes. Be sure to note the helpful hints provided along the way.
Replying to a Post
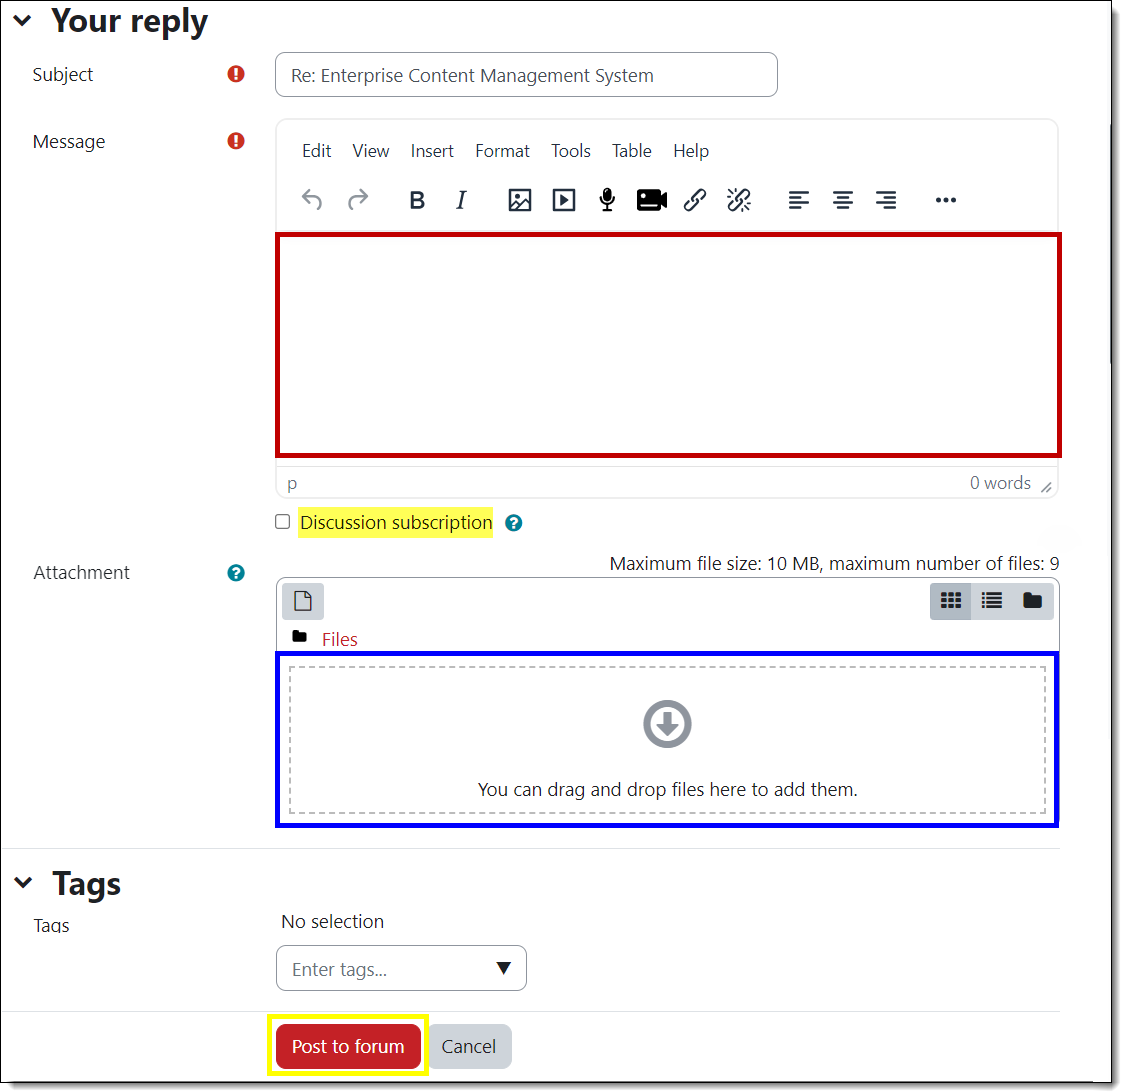
Unlike an initial post, the reply textbox features a simple interface for entering plain text: there are no editing tools immediately available to you. They are still there! You just have to click on the Advanced link in the lower right corner to access them.
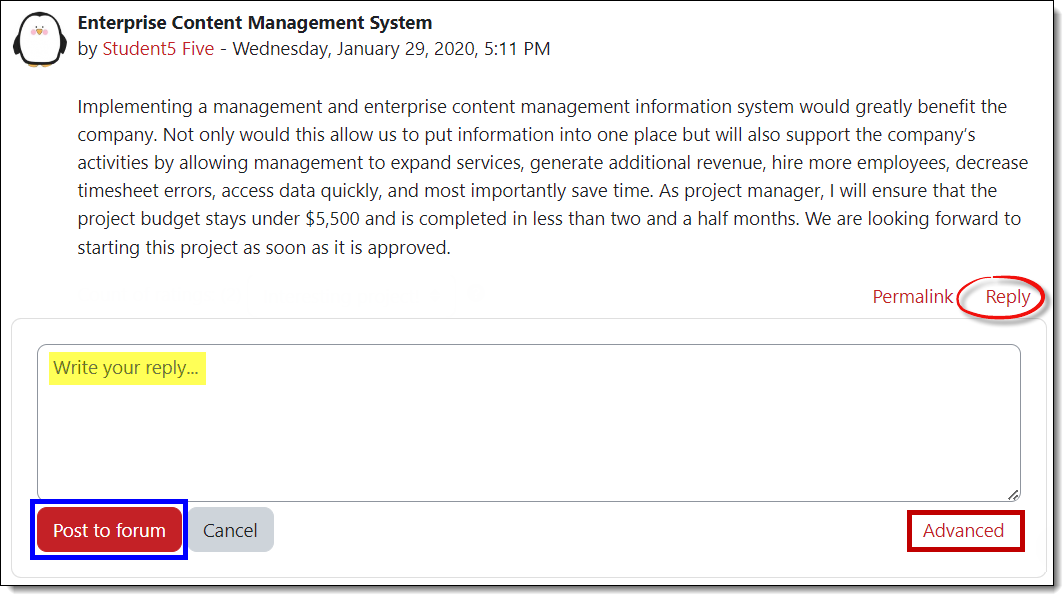
Once you open this editor, you'll be able to use all of the formatting options available in our normal HTML editor, as well as subscribe to a forum and/or attach a file.
Attach a Link
 Would you like to insert a URL that others can click on to navigate to a website? Download these instructions to embed a link in any Moodle text box.
See this comprehensive guide to attach a file or display a video in a forum post.
Insert an Image
It's not hard to insert images in Moodle posts, but you do need to be careful about image size. Some important things to note about inserting images directly in Moodle textboxes such as forum posts, online text assignments, and glossaries:
- Images must be saved as individual files or posted to a website in order to be inserted in Moodle.
- Acceptable image file types are .jpg, .gif, and .png.
- You cannot copy and paste or drag and drop an image into Moodle. You must use the Insert/edit image icon on the toolbar. (See the illustrations here and/or the guide linked below to learn how to customize your image.)
- Images will display in their "native" (original) size, so be prepared to adjust them for best fit.
- When resizing images, you need only change one of the two dimensions as long as the "Auto size" option is checked. Moodle will adjust the other dimension to fit without stretching or flattening your image.
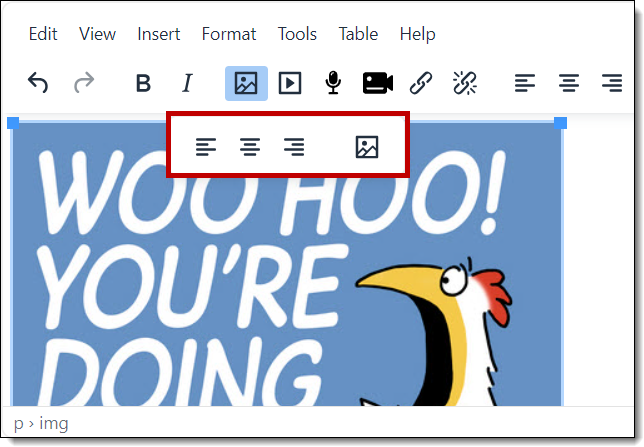
- If you have any trouble getting an image to appear where you want it to go with your text, try entering your text first, then inserting your cursor at the beginning of the paragraph where you want the image to be displayed and inserting the image at that point. Set the alignment for Right or Left and see what happens!
- Large image files (1 MB and up) are slow to load and take up valuable storage space. Learn about resizing images or you can contact the Help Desk for assistance.
Read more about the entire image insertion process.
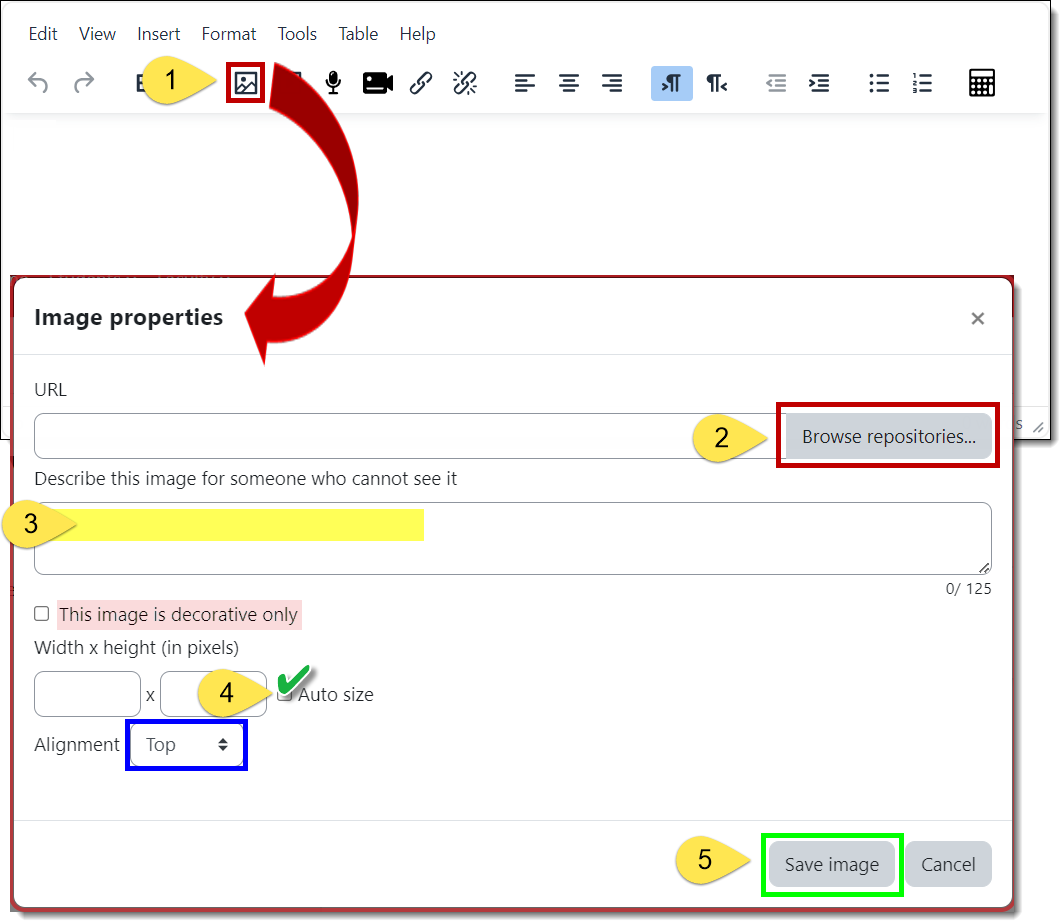
To insert an image:
- Click on the insert image icon in the textbox toolbar.
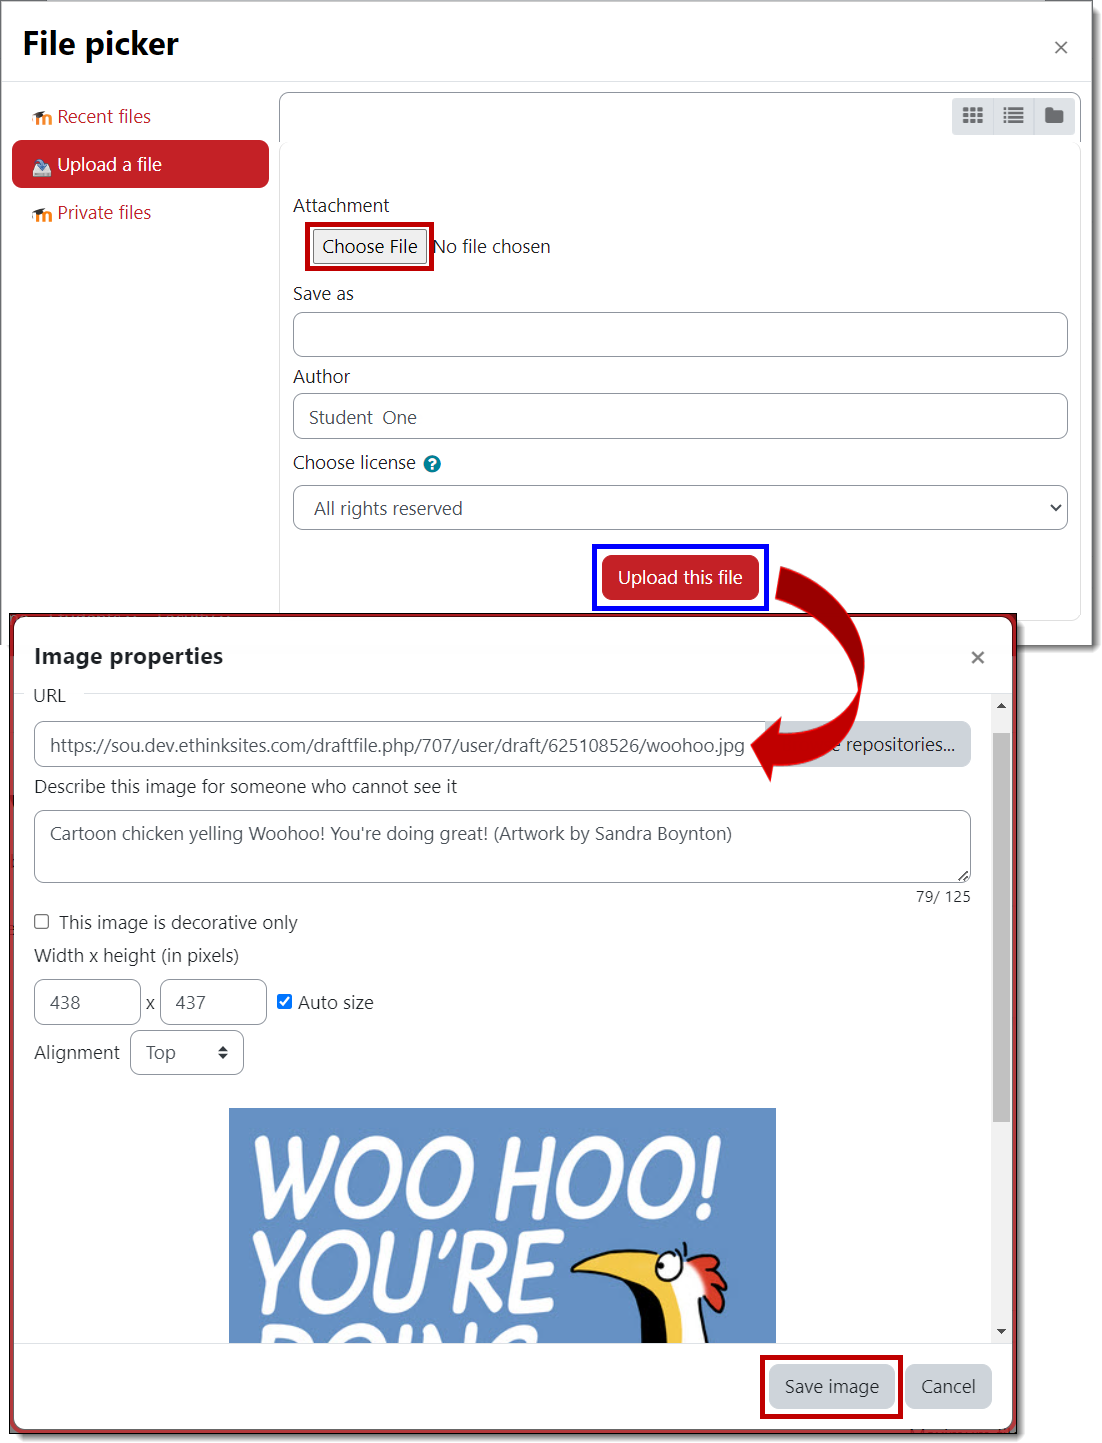
- Click on Browse repositories... to upload an image file from your computer or paste the URL of an image posted to the web in the field provided.
- After selecting your image, add a description of the image in the field provided to create "alt text" for anyone using an assistive device to view your posting or check the box below the description field to indicate that the image is purely decorative.
- Check the box to Auto size your image to ensure that the proportions are maintained correctly. (You can also designate a specific height or width for your image in pixels — 1 inch = 96 pixels [call it 100 and make it easy on yourself!].)
- Click on Save image to return to your textbox.
Subscribe to a Forum
 Moodle makes it possible to follow a forum or a discussion thread by "subscribing" to it. Each time a person posts to the forum (or replies to a post) that you're subscribed to, you'll receive an email message. This is really handy for group projects,
for instance, as you can be notified when one of your teammates has added a post.
Moodle makes it possible to follow a forum or a discussion thread by "subscribing" to it. Each time a person posts to the forum (or replies to a post) that you're subscribed to, you'll receive an email message. This is really handy for group projects,
for instance, as you can be notified when one of your teammates has added a post.
Some forums may be set up so that everyone is subscribed without having the option to unsubscribe. Ask your instructor if you have questions about a particular forum.
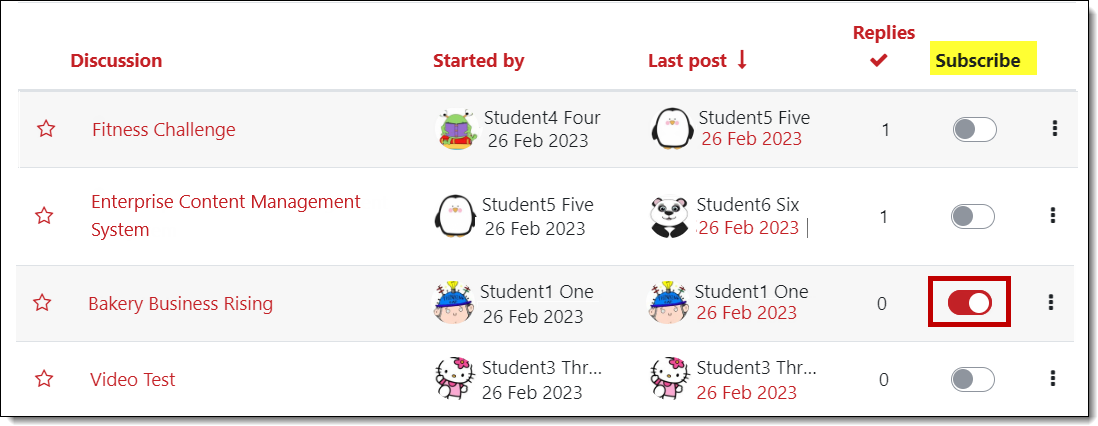
As shown in the first image below, you can subscribe to an entire forum by clicking on the Subscribe to forum button. The second image illustrates how you can subscribe to a specific discussion thread by clicking on the Subscribe icon in the forum. When you subscribe to a thread, you'll receive an email each time someone replies to that thread.
To unsubscribe from a forum, reopen the admin gear and click on Unsubscribe from this forum.

Update Your Preferences
In the early days of Moodle at SOU (prior to 2016), accounts were set up so that all users were automatically "subscribed" to discussion forums in their courses. As a result, once you had made a posting to a forum, you would receive an email message whenever anyone else made a post to that forum. That could be a lot of email! If your account was created prior to 2016 and you do not wish to receive these emails, you can turn off this feature by changing your forum preferences.
To disable this setting (and stop future automatic subscriptions):
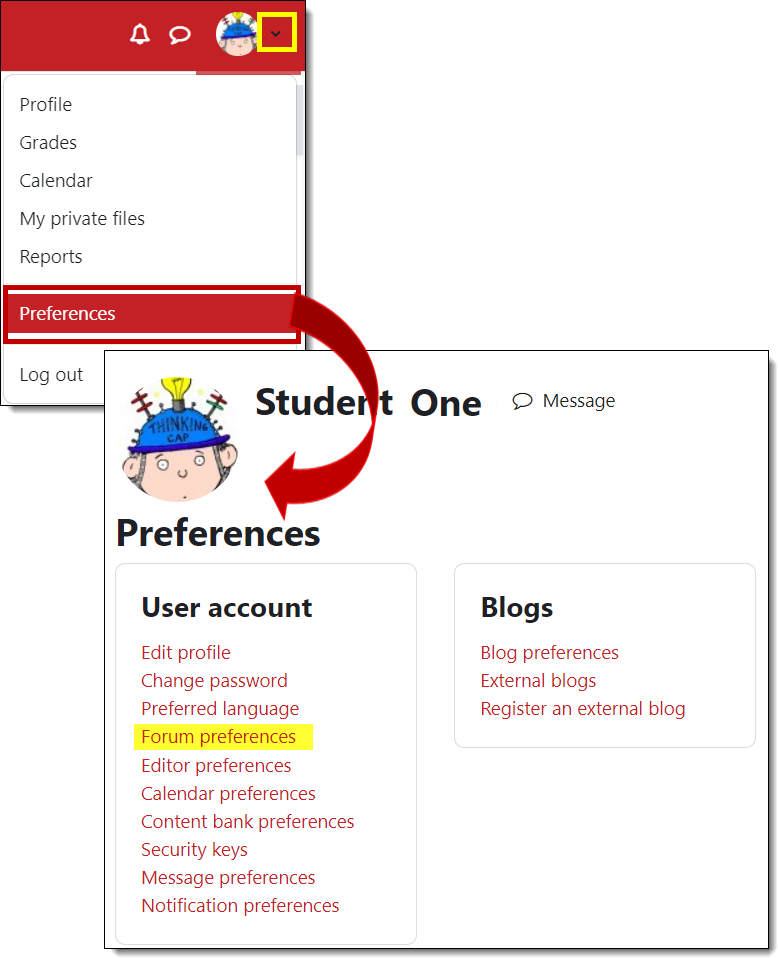
- Open the user menu in the top right corner of your Moodle page.
- Click on Preferences, then Forum preferences.
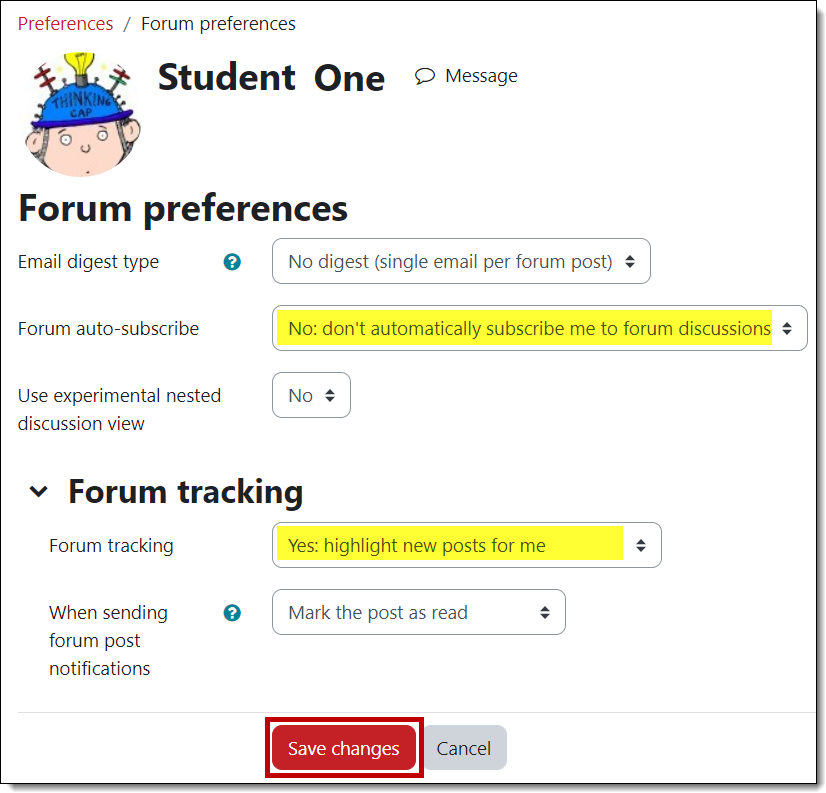
- Use the pull-down menu to change the Forum auto-subscribe setting to No: don't automatically subscribe me to forums.
- For your convenience, update the Forum tracking setting to Yes: highlight new posts for me. This setting indicates when new messages have been posted by your instructor and classmates.
- Save changes.
Your auto-subscribe setting will apply to future forums in which you post in all of your course sites. If you are currently subscribed to a forum, you must unsubscribe yourself as shown on the previous page.
Working in Groups
 From time to time, your instructors may ask you to work on group projects in Moodle. Group work is conducted in specially designated discussion forums and in chat sessions reserved for groups. In both cases, Moodle offers two settings for group activities,
visible groups and separate groups:
From time to time, your instructors may ask you to work on group projects in Moodle. Group work is conducted in specially designated discussion forums and in chat sessions reserved for groups. In both cases, Moodle offers two settings for group activities,
visible groups and separate groups:
- Visible Groups: Everyone can see the work done by every group, but may only contribute in their assigned group.
- Separate Groups: Only group members (and the instructor) may contribute and view the group's work.
Working in Your Group Forum
In your designated group forum, click on the Add a new discussion link to post a message to your teammates. You can also use the Reply button to respond to a post made by one of your teammates.
Sharing Files
To share files with your group members, open the forum designated for your group work. Use the Add a new discussion link to post a message and attach your file(s). (If you need to attach multiple files and the forum is set up to accept only a single file, ask your instructor to adjust the forum settings—it's easily overlooked in the forum creation process.)Who's in my Group?
Moodle is a bit secretive about informing you of who else is in your group. One way to find out is to click on Compose new email in the Quickmail block in your course site. Click on the name of your group under Potential sections and
click on Add. You can also ask your instructor to add a "Group Members" resource to your course.
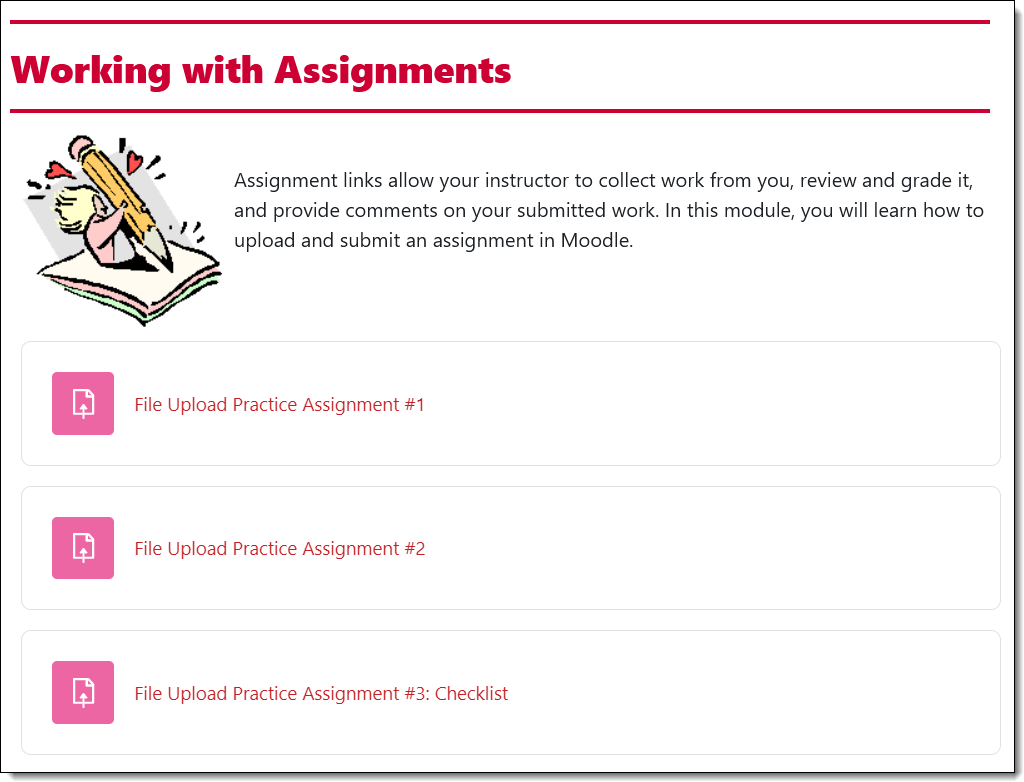
Working with Assignments
Moodle features three different types of assignment links:
- File uploads—submit one or more files
- Online text—enter text in a textbox
- Offline activity—perform a task that doesn't result in a digital artifact
You'll recognize an assignment by the submission icon that accompanies it on your course home page.
Download this guide to assignments for details. Refer to these detailed instructions on submitting a Turnitin assignment, including viewing an "Originality Report." See this comprehensive guide to attach a file or display a video in
an online text assignment activity.
For more information and the opportunity to practice submitting an assignment, see the Assignments module in the Test Drive site. (You'll need to enroll in
the course.)
View Feedback
Looking at your score in the gradebook may only give you a glimpse of the feedback that your instructor has provided. To get the whole story, open the assignment link itself—that's where you can access a file that's been returned to you and/or review all of the elements that were scored in a rubric.
To see all of your instructor's feedback on your submission, open the assignment link and scroll down below the submission status section. You'll see any comments that your instructor has provided as well as any files returned to you. (See this article to learn about viewing feedback in a rubric.)

Using the Calendar
 Classes, homework, exams, papers, quizzes, parties, concerts, movies... The list goes on and on. You have so much to do, and it can be difficult keeping up with it all. How do you do it? One solution is to use your Moodle Calendar. The calendar can
become a great planning tool for your school and personal life. On your Moodle Calendar, you will see different types of events, assignment due dates, and course or school reminders.
Classes, homework, exams, papers, quizzes, parties, concerts, movies... The list goes on and on. You have so much to do, and it can be difficult keeping up with it all. How do you do it? One solution is to use your Moodle Calendar. The calendar can
become a great planning tool for your school and personal life. On your Moodle Calendar, you will see different types of events, assignment due dates, and course or school reminders.
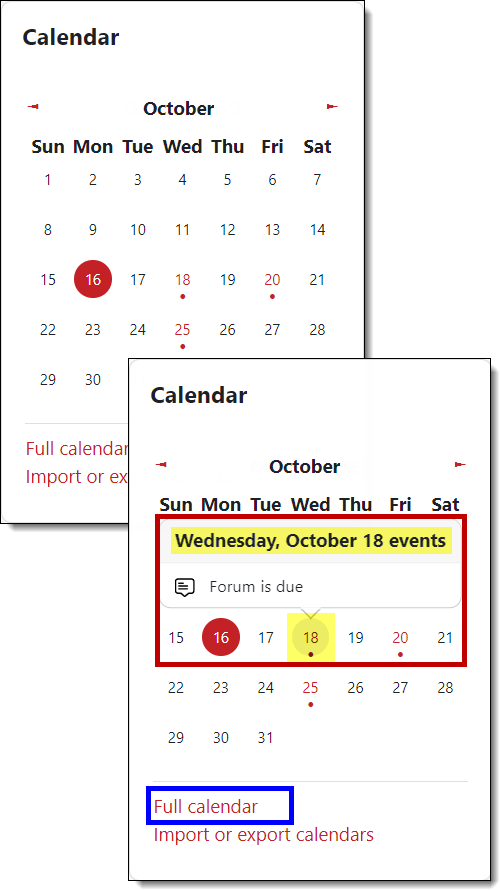
The Moodle Calendar can be accessed from your Moodle home page and may be found in the blocks panel on the right side of your dashboard and your course pages. Expand the blocks panel to display the calendar.
Click on any date where an activity is linked — indicated in red with a dot below it — to display information about the activity and a link to it. Click on the link to learn more about the activity. To
add events of your own to the course events already listed, click on Full calendar.
Messages in Moodle
 Choose when you'd like to receive messages from Moodle!
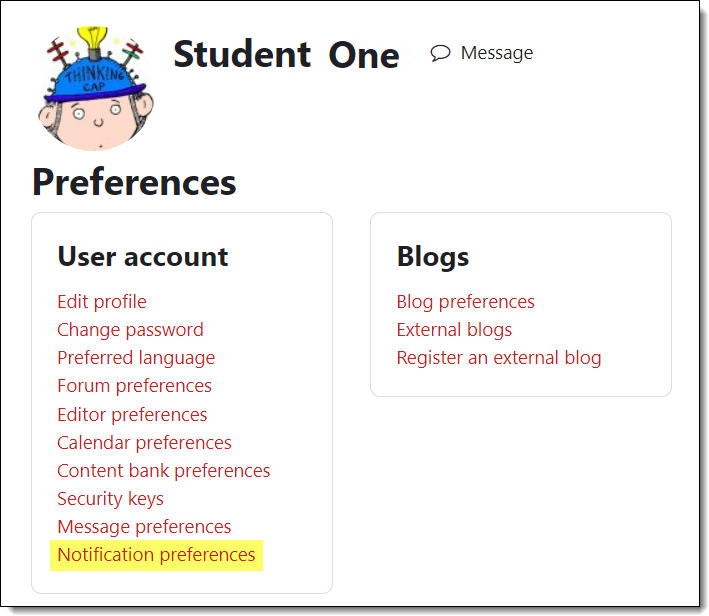
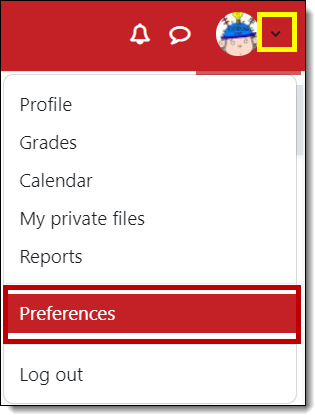
To customize your settings, click on the user menu next to your name in the upper right corner of your screen and choose Preferences.
From the list of options displayed, click on Notification preferences.
Email messages and pop-up notices will be sent to you according to the options that are checked in the notification configuration page shown below. You can choose notifications to be made when you are online—logged into Moodle—or offline—not logged into Moodle. To change these settings, click the boxes in the configuration table. The default settings will suit most students.